Create a Node.js REST api using node-trekker.
A Ruby on Rails inspired generator


What is Node-Trekker?
Node-trekker is a ruby on rails inspired generator for node.js applications using express and mongoose. With simple commands that can save you valuable time. After setting up node-trekker, a command as simple as:
generate crud user firstName:String lastName:String profilePic:Image
will generate everything you need to get going.
Disclaimer
Node-trekker is not a production ready tool yet, this is for quick prototyping only. Make sure to check out the documentation for Node-trekker for more information. You can also find a guide on how to use node-trekker to generate routes for saving images and files into mongoDB with gridfs and multer.
Setting up your development environment.
We’ll be using Visual Studio Code in this tutorial, but you can use any text-editor. You’ll need NodeJS and Npm installed. For our database we’ll be using a free tier of mongoDB Atlas. Once that’s all ready, lets get started.
First, open up visual studio and open a new blank project in your desired location. Then open the visual studio code integrated terminal and use this command to initiate your app:
npm init Your-App-Name-Here
Next install these packages:
npm i dotenv express mongoose
Now we’ll install node-trekker as a dev dependency:
npm i node-trekker -D
Open up your package.json, and modify your scripts to match these:
"scripts": {
    "server": "server.js",
    "node-trekker": "node node_modules/node-trekker/index.js"
  },
Your package.json should look similar to this:
{
  "name": "your-app-name",
  "version": "1.0.0",
  "description": "",
  "main": "index.js",
  "scripts": {
    "server": "server.js",
    "node-trekker": "node node_modules/node-trekker/index.js"
  },
  "dependencies": {
    "dotenv": "^10.0.0",
    "express": "^4.17.1",
    "mongoose": "^5.12.11"
  },
  "devDependencies": {
    "node-trekker": "^2.0.0"
  }
}
Connecting to our database
First we need to create a .env file at the root of our project, this will hold our database variables and our port.
Your .env file should look like this:
DATABASE_URL=your-database-url-here
PORT=3001
If you are using mongoDB Atlas, i'll show you how to create a database and find your DATABASE_URL now.
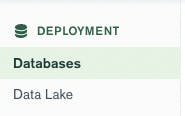
First, log in to mongoDB. Navigate to Databases in the left side menu under deployment.
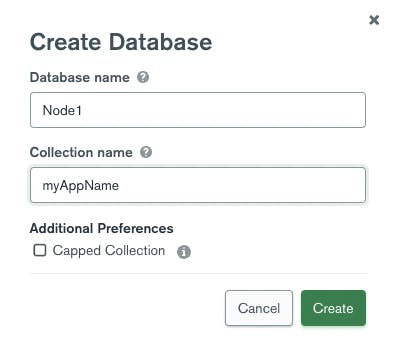
Click on + Create Database

Enter a Database name and Collection name of your choice, click create.
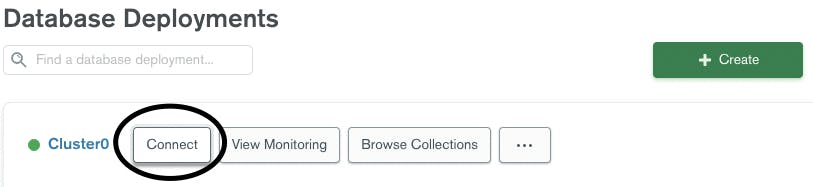
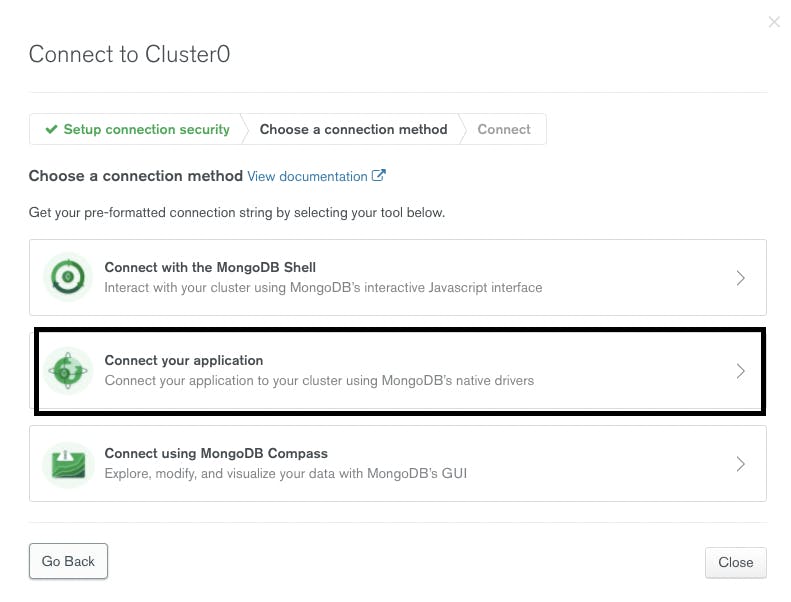
Find your database and click on Connect.
Click on Connect your application.
Copy the string listed here.
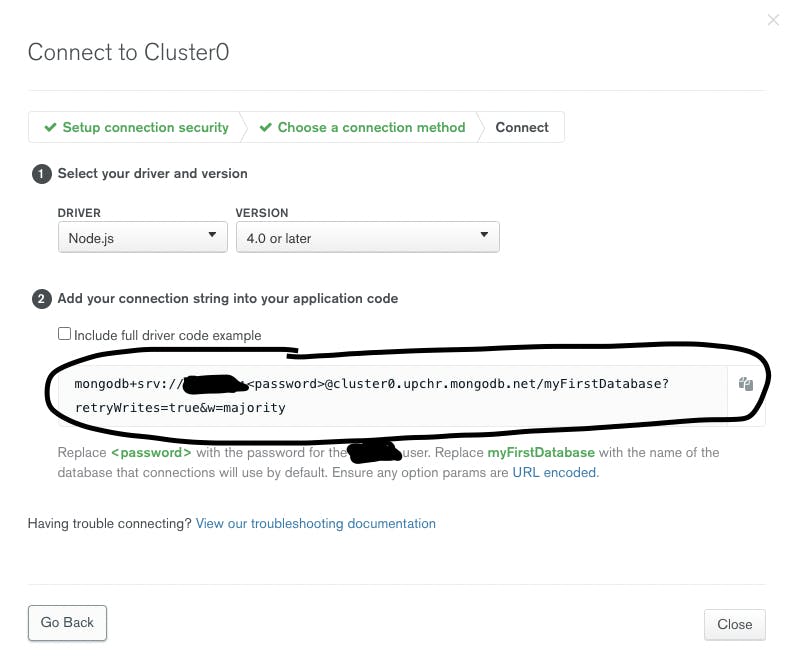
Take that string and set it as your value for DATABASE_URL in your .env file.
DATABASE_URL=yourMongoDbStringHere
PORT=3001

if your password is test123, than replace all of <password> with test123
Replace myFirstDatabase with the name of the collection you created inside of your database earlier.
You're ready to use mongoDB!
Using the generator
We'll have multiple examples ahead, feel free to skip ahead or just go to the Node-Trekker documentation now.
Pretend our front-end application is a blog, it's reasonable to think that we need to store blog posts in our database. So we'll need a model with certain attributes for each blog post, Title and Description for example. Title and description are both strings. We also need actual routes for our front-end app to perform api calls on. We need create, read, update, and delete routes.
Lets use this information to create a server, router, and model with node-trekker.
First, open your terminal and run:
npm run node-trekker
Next, run:
generate crud blogPost title:String description:String
It's important that the S in String is capitalized, as this is passed directly into the model behind the scenes.
Take a look at the files that have been generated, This will generate a server.js file if you haven't already created one, a blogPost router if you haven't already created one, and a blogPost model if none exists.
Testing our app
Almost there! Just use this command to start your server:
npm run server
Your Restful api should be up and running, and you should see this in your terminal:
running at http://localhost:3001
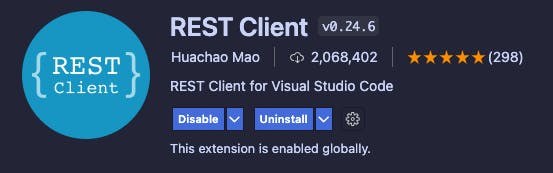
You might notice that some .rest files were generated earlier. If using visual studio code, you can download the extension below to test your api routes with .rest files.
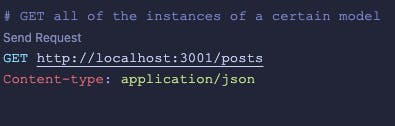
Simply click on Send Request and see how your model is working.
Since we used blogPosts in our example, navigate to: http://localhost:3001/blogPosts in your browser. You should see an empty page with only a opening and closing square bracket, like this:
[]
If you do, Your server is working! There's just no data for it to return yet.
Now we'll use the .rest files to test our server in more detail. Make sure you have the extension above installed for this. These .rest files imitate a front-end application sending our server a request.
Let's try creating a blog post. Navigate to your blogPost.rest file. and look for this portion of code:
POST http://localhost:3001/blogPosts
Content-type: application/json

{
  "title": "A test title",
  "description": "some description text"
}
If you have installed the rest extension above, you should see a "send request" button right above the POST http://localhost:3001/blogPosts line, click that button.
You should see something like this:
HTTP/1.1 201 Created
X-Powered-By: Express
Access-Control-Allow-Origin: *
Access-Control-Allow-Methods: GET,PUT,POST,DELETE
Access-Control-Allow-Headers: Origin, X-Requested-With, Content-Type, Accept
Content-Type: application/json; charset=utf-8
Content-Length: 162
ETag: W/"a2-Jdnz2QK0xnISWogDw+aTOQ2nlYc"
Date: Tue, 04 Jan 2022 01:17:59 GMT
Connection: close

{
  "message_type": "success",
  "message": "good response",
  "post": {
    "createdOn": "2022-01-04T01:17:49.493Z",
    "_id": "61d3a047d20fd5a9fdc99f7a",
    "title": "A test title",
  "description": "some description text"
    "__v": 0
  }
}
Let's take a look at what was returned to us. First lets look at the http status returned:
HTTP/1.1 201 Created
We got an http status of 201, this indicates a good response.
Now let's look at the actual JSON that was returned:
{
  "message_type": "success",
  "message": "good response",
  "blogPost": {
    "createdOn": "2022-01-04T01:17:49.493Z",
    "_id": "61d3a047d20fd5a9fdc99f7a",
    "title": "A test title",
  "description": "some description text"
    "__v": 0
  }
}
We can see that we received a message_type and a message. These might be used for alerts or notifications on your front end application:
"message_type": "success",
 "message": "good response",
The blog post we just created, was also sent back to us:
"blogPost": {
    "createdOn": "2022-01-04T01:17:49.493Z",
    "_id": "61d3a047d20fd5a9fdc99f7a",
    "title": "A test title",
  "description": "some description text"
    "__v": 0
  }
Conclusion
I hope this short tutorial has been helpful, we have a basic functioning api and now have the knowledge to create more routes, models, and more. Again, I highly encourage you to check out the Node-Trekker documentation. This is a useful tool for somebody who might be starting out with NodeJS or just wants a quick api built for prototyping. This is not a feature packed tool, and will not generate perfect code for a production app. I highly encourage anyone interested in improving this app to make changes and submit a pull request.